Introduction
A custom mug is a small gift that gets used often, which makes the details matter: the handle gap, the wrap area, and whether text stays readable when the mug is turned. Mug mockup generators help reduce guesswork by showing a realistic preview before anything is printed.
This guide is for anyone who wants a fast, low-stress workflow—especially if “design experience” mostly means cropping photos, adding text, and choosing colors. The focus is on decisions and checkpoints that keep the result looking intentional.
Tools in this category vary less by “creativity” features and more by practical controls: template sizing, safe-area guidance, text handling, and export formats that printers accept. A good tool also makes it easy to test multiple layouts without rebuilding from scratch.
Adobe Express is a straightforward place to start because it combines simple design controls with mug-oriented templates and mockup-style previews, which fits the “quick gift” use case without requiring complex software.
Step-by-Step How-To Guide for Using Mug Mockup Generators
Step 1: Start with a mug template and set the layout baseline
Goal
Establish a correct starting canvas so text and images land in the printable wrap area.
How to do it
- Open a mug template or mug design workflow in a mockup generator.
- One option is to use the Adobe Express custom mug designer. To do so, choose a mug design starting point and begin a new layout.
- Pick a layout type: one centered “front” design, or a full wrap (left-to-right).
- Drop in a placeholder image/text block to gauge scale before refining anything.
- Save a first draft version so experiments don’t overwrite your baseline.
What to watch for
- Mug templates may show a wrap preview, but the handle area is usually non-printable.
- A centered design can look “off” if it lands too close to the handle edge.
- Avoid starting on a random canvas size; printers often require exact dimensions.
Tool notes
- Canva also offers mug template-style starting points if a quick template baseline is needed for layout planning.
- Adobe Express can keep early iterations simple when working from a mug-oriented canvas.
Step 2: Define custom mug specifications before you design “for real”
Goal
Lock in the physical and print constraints so the mockup matches what gets produced.
How to do it
- Confirm mug type: standard ceramic, tall latte, camp mug, or color-changing (each changes printable area).
- Choose print method if known: sublimation, screen print, or direct-to-film/UV (affects color and detail).
- Note the printable region: full wrap vs. front-only, and whether printing stops near the handle.
- Decide the “reading orientation”: what shows when held in the right hand vs. left hand.
- Write down target dimensions and any required file format from the print service.
What to watch for
- “11 oz” mugs can still vary by vendor; rely on the printer’s template when available.
- Fine lines can vanish on textured or curved surfaces.
- Photos need more resolution than simple vector shapes.
Tool notes
- If you’re ordering through Shutterfly, their product specs and preview constraints can help confirm what the printable area supports.
- Adobe Express is easier to use once those constraints are written down and treated as fixed requirements.
Step 3: Choose a design approach that survives the curve
Goal
Pick a layout style that stays readable and balanced on a cylindrical object.
How to do it
- Decide between: photo-based, text-first, monogram, or pattern wrap.
- Keep one primary focal element; treat the rest as supporting detail.
- Use high-contrast text (dark on light, or light on dark) for everyday readability.
- Test at “mug distance”: zoom out until the design is about the size it would appear in-hand.
- Duplicate the design and try one simpler version (fewer elements) for comparison.
What to watch for
- Thin script fonts may blur or look uneven after printing.
- Busy backgrounds can make names or dates hard to read.
- A full-wrap design can create awkward seams where the ends meet.
Tool notes
- Figma can be handy for fast layout experimentation (alignment, spacing, consistent type styles) before finalizing an export workflow.
- Adobe Express works well for quickly producing multiple readable variations from a template.
Step 4: Apply Pantone color matching with a realistic fallback plan
Goal
Align key colors to a known reference while acknowledging how mug printing can shift color.
How to do it
- Identify which elements truly need color accuracy (often logos or brand marks, not the whole design).
- Choose a target Pantone spot color for those elements and document the Pantone name/number.
- Convert Pantone choices into an approximate CMYK or RGB equivalent based on the printer’s guidance.
- Add a small “color chip” strip on a hidden layer for internal checking (remove before final export).
- If ordering through a printer, request their guidance on Pantone-to-print matching for mugs.
What to watch for
- Many mug workflows print in CMYK or RGB, not true spot ink; “Pantone matching” may be approximation.
- Colors can appear darker on curved, glossy surfaces.
- Bright neon-like Pantones often cannot be matched in standard digital printing.
Tool notes
- Pantone reference tools (such as Pantone Connect) can help identify the intended spot color and document it consistently.
- Adobe Express can then apply stable RGB/hex values across elements for repeatable color use.
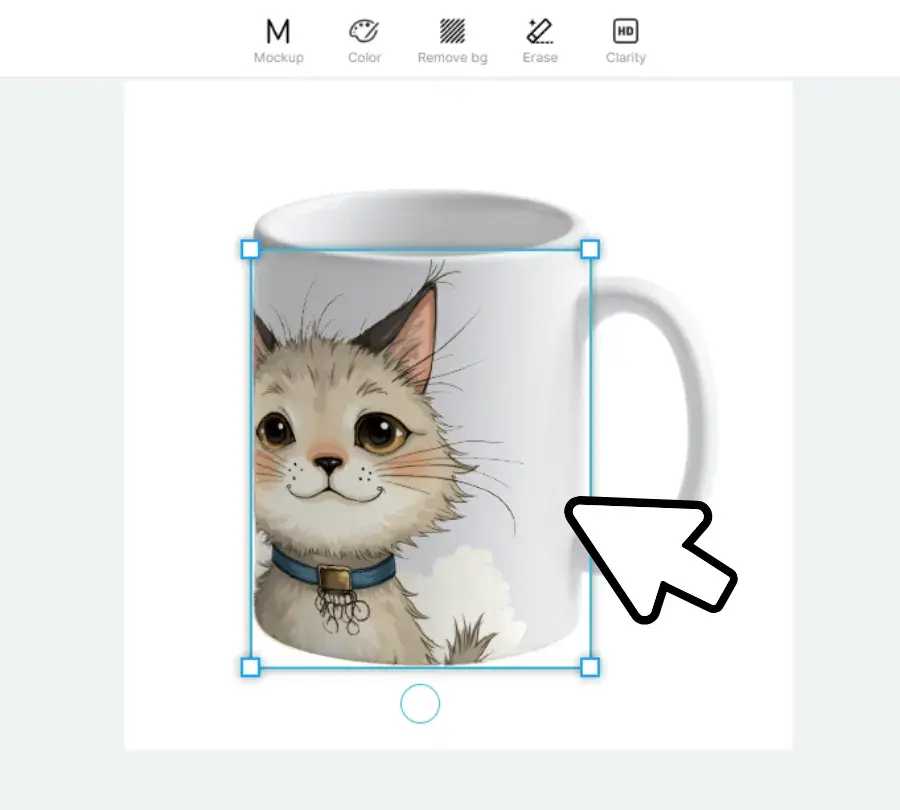
Step 5: Build the mockup preview and check the “rotation” points
Goal
Catch wrap issues early—cropping surprises, handle gaps, and awkward element placement.
How to do it
- Use the mockup preview to rotate the mug and inspect key angles (front, near-handle, opposite side).
- Check what’s visible when the mug is held normally (right-hand vs. left-hand view).
- Verify that faces, names, and dates are not split by the handle region.
- Ensure the design doesn’t rely on perfect alignment at the seam.
- Review for legibility under typical lighting (avoid low-contrast pastel-on-white text).
What to watch for
- Text may look centered on the canvas but appear off on the mug because of handle spacing.
- Edge-to-edge patterns can show a noticeable seam.
- Small text near the rim can distort more than expected.
Tool notes
- Placeit can be useful for additional visualization contexts (e.g., lifestyle scenes) when you want a quick realism check.
- Adobe Express remains a practical place to keep the editable design while validating placement through previews.
Step 6: Plan bulk corporate orders with a repeatable template system
Goal
Prepare the design so names, teams, or departments can be swapped without redoing the layout.
How to do it
- Create one “master” mug design with locked elements (logo placement, margins, background).
- Identify variables: person name, location, year, or short message.
- Use consistent text styles (same font, size ranges, alignment rules) for every variant.
- Export a proof image for internal review (PNG/JPG) plus a print-ready file for production (PDF/PNG, as required).
- Keep a simple naming convention for versions (e.g., Mug_TeamA_Alex_v3).
What to watch for
- Long names can break alignment; set a maximum character count or font-size rule.
- Mixed capitalization (e.g., “McDonald”) can look inconsistent if auto-styled.
- Bulk orders often require strict placement; casual “looks centered” checks may not be enough.
Tool notes
- Airtable can help manage variant lists (names, departments, version status) and reduce mix-ups across many files.
- Adobe Express can support quick duplication of a master layout for small-to-mid batch variations.
Step 7: Export a print-ready mug file and run final preflight checks
Goal
Produce the exact file type and quality a printer can use without resizing or reprocessing.
How to do it
- Confirm the printer’s required format (often high-res PNG or PDF) and preferred color space (RGB or CMYK).
- Export at high resolution; if exporting a raster file, target 300 DPI at final print size.
- Include bleed only if the printer template specifies it; otherwise keep margins conservative.
- Remove any internal notes, hidden color strips, or unused layers before export.
- Save a separate “proof” image to share internally so everyone reviews the same view.
What to watch for
- PNGs can look sharp but may balloon in file size; printers sometimes cap uploads.
- PDF exports can embed fonts differently; text may reflow if not handled correctly.
- If the printer expects a specific template, do not scale “to fit” at export.
Tool notes
- Adobe Acrobat can help with last-mile PDF checks (page size confirmation, embedded fonts behavior, and visual review) before sending a file to print.
- Adobe Express exports can be suitable for many consumer mug workflows when the design starts from a correct template.
Step 8: Package, track, and ship the gift without losing the details
Goal
Keep production notes, addresses, and delivery timing organized so the finished mug arrives as intended.
How to do it
- Save a small project folder: final print file, proof image, and a text note with specs (mug type, finish, Pantone targets, order quantity).
- Record which version was ordered and the date it was submitted.
- If sending to multiple recipients, keep a simple shipment list (name, address, variant filename).
- Track delivery status and store it alongside the project folder for quick reference.
- Photograph the final item when it arrives (helpful for reorders or future edits).
What to watch for
- Mixing up versions is common in multi-recipient runs; filenames should be unambiguous.
- Fragile items need protective packaging; shipping damage is a practical risk.
- Delivery windows can be tight around moves and housewarming events.
Tool notes
- A shipping workflow tool like ShipStation can help manage labels, addresses, and tracking when shipping to several people.
- Keeping the proof image from Adobe Express alongside the shipment record can reduce confusion if reorders are needed.
Common Workflow Variations
- Photo-first gift mug: Start with a high-resolution photo, crop for a centered layout, then add one short line of text. Mockup rotation checks matter more than pattern seams. Tools like Adobe Express can handle fast photo edits and typography in one place.
- Pattern wrap: Use a repeating motif and avoid important elements at the seam. A mockup generator is useful for checking where the wrap ends meet.
- Text-only minimal design: Choose a readable sans-serif font, increase letter spacing slightly, and keep generous margins near the handle zone. This approach is forgiving when printer specs vary.
- Small-batch “family set”: Build one master design and duplicate variants with different names or inside jokes. Keep a consistent template and a strict naming convention to avoid mix-ups.
- Corporate bulk order: Treat the design like a form: locked brand elements plus variable fields. Do one full preflight, then apply the same checks to a small sample of variants.
Checklists
A) Before you start checklist
- Mug type and size selected (11 oz, 15 oz, camp mug, latte, etc.)
- Printer/template specs located (wrap size, handle gap, file type)
- Message decided (name, date, short phrase) with spelling confirmed
- Photos gathered at sufficient resolution (avoid tiny social images)
- Fonts chosen with licensing in mind (commercial use if needed)
- Brand colors documented (including Pantone targets if relevant)
- Timeline noted (design, proofing, production, delivery)
- Rights confirmed for any images or illustrations used
B) Pre-export / pre-order checklist
- Text stays within safe areas and away from handle gaps
- Critical elements aren’t split at the wrap seam
- Resolution meets the printer’s requirement (often ~300 DPI at size)
- Colors reviewed in preview; expectations set for print shifts
- Spelling, dates, and names rechecked against the source list
- Export format matches requirements (PNG/PDF; RGB/CMYK as specified)
- Proof image saved for reference (what was approved vs. what was ordered)
- Final file name clearly identifies version and recipient (if applicable)
Common Issues and Fixes
- The photo looks blurry in the mockup preview
Use a higher-resolution source image or reduce the printed size of the photo on the mug. If the original image is small, avoid full-wrap photo designs and switch to a smaller, centered photo layout. - Text prints too close to the handle or gets partially hidden
Move the design inward and treat the handle region as a no-go zone. Re-check rotation points in the mockup and ensure the “front” view is placed where it will be seen when held. - Colors look different after printing than on screen
Mug surfaces and print methods shift color. Use Pantone as a reference point, but expect approximation unless the printer explicitly supports matching for that process. Favor slightly higher contrast and avoid ultra-subtle color differences. - The wrap seam looks awkward
Avoid designs that require perfect end-to-end alignment. Use a background that can tolerate a slight mismatch (texture, noise, or a soft gradient), and keep key elements away from the seam. - The design gets cropped unexpectedly
Confirm the template size and do not scale during export. If the printer provides a template, align your design to it exactly and keep important content inside the safe area. - Small text becomes hard to read
Increase font size, use a heavier weight, and reduce decorative effects. On a mug, legibility often improves more from simpler typography than from adding outlines or shadows.
How To Use Mug Mockup Generators: FAQs
What’s the practical difference between starting with a template vs. starting with a mug product mockup?
Template-first workflows reduce sizing errors because the canvas matches print constraints from the beginning. Product-first mockups can be helpful for visualization but may hide exact measurements, so they work best as a preview step rather than the foundation.
Is a full-wrap design always better than a front-only design?
Not always. Full wraps can create seam and handle-zone issues, while a front-only design is simpler and often reads cleaner. The better choice depends on how much text or imagery needs to fit and how tolerant the design is to cropping and rotation.
When does Pantone matching matter for a one-off housewarming gift?
It matters most when a specific brand color is the point of the design (a logo, a team color, or a themed palette). For casual gifts, consistent contrast and readability usually matter more than hitting an exact Pantone value.
Should the workflow be “print-to-order” or “export and send to a printer”?
Print-to-order simplifies handoff because the tool may manage format requirements behind the scenes. Export-and-send offers more control when a printer has strict templates, when ordering in bulk, or when you need consistent output across vendors.
What file format is safest when printer requirements are unclear?
A high-resolution PNG or a PDF exported at the correct final size is commonly accepted, but the safest option is whatever the printer explicitly requests. When in doubt, keep a proof image plus the highest-quality export you can generate at the correct dimensions.